Ray Tracing 008Anti-Aliasing
 Back to Hittable
 Back to Ray Tracing
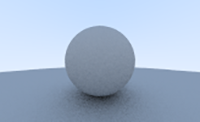 Continue with Diffuse Materials
Summary
- Added anti-aliasing to the image.
- Excursion: I ran some benchmark tests and experiment with a few ways to improve rendering performance in Javascript.
The previous pictures looked a little rough and pixelated around the edges. Pictures taken with a real camera look smoother because the edge pixels are a blend of some foreground and some background.
Anti-aliasing helps create smoother edges. This effect can be achieved by averaging a number of random samples inside each pixel. This will produce a color that consists of part background, part foreground.
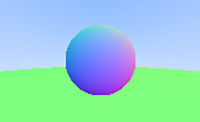
Here's a detail image without anti-aliasing:
Loading...
To view more details, you can zoom in using your mouse-wheel, and drag the image around to the desired point of view. In this example I essentially shot one ray through a pixel and took the color as its final value. It would either turn out to be blue, green, or pick the light blue background color.
float u = float(i) / float(nx);
float v = float(j) / float(ny);

ray r(origin, lower_left_corner + u * horizontal + v * vertical);

vec3 col = color(r, world);
int ir = int(255.99 * col[0]);
int ig = int(255.99 * col[1]);
int ib = int(255.99 * col[2]);
And here's the same image with anti-aliasing:
Loading...
Note how there are different shades of the blue, the green and the light blue background colors. This image was rendered with a default of 100 random samples per pixels. Move the slider to adjust the number of samples. The implemention is pretty simple with a loop that sums up all color values and divides by the number of samples at the end.
vec3 col(0,0,0);
for (int s = 0; s < ns; s++) {
  float u = float(i + random_double()) / float(nx);
  float v = float(j + random_double()) / float(ny);

  ray r = cam.get_ray(u, v);

  col += color(r, world);
}
col /= float(ns);
int ir = int(255.99 * col[0]);
int ig = int(255.99 * col[1]);
int ib = int(255.99 * col[2]);
The variable ns is the number of random samples. In this example it was set 100. In this loop we
shoot 100 random rays through the pixel. The random_double() function returns a random number
between 0 and 1. Then we add up those 100 color samples and divide them by the number of samples.
The smaller the number of samples, the rougher the edge. Having just one random sample produces a
an image that looks even worse than not sampling at all. This is because it's a random decision that
produces the color of the sphere, not the model of equation of the sphere. To see what happens,
try moving the slider closer to 1.
And here's the complete image:
Loading...
Javascript and Canvas
I didn't expect it to happen so soon in my journey, but after I added anti-aliasing to my Javascript code it slowed down noticeably. Not too bad yet, but waiting over 4 seconds to render this simple scene was unacceptable. Every further addition to this program would not only be expensive and cause a long wait but also affect the experience to the point that the browser becomes unresponsive for too long.
I ran a few tests to measure the time and before and after various improvements. The measured time is not very accurate because it varies with whichever other events the browser has to process. To even out the measured times I let the code compute the image 10 times and took the average of 10 measured times. Here's what I found and tried to improve the performance:
-
Starting point without optimizations:
Total time for 10 passes: 42957.70499999708ms
Avg time per pass: 4295.770499999708ms = 4.296s
-
Optimized vec3 class: Removed explicit parseFloat(), this.e[] array, x/y/z getters.
Total time for 10 passes: 28153.2100000004ms
Avg time per pass: 2815.32100000004ms = 2.815s
Quite a significant improvement!
-
Optimized vec3 class: Revoved data type conditional, split into add() and addfl() functions.
Total time for 10 passes: 23230.534999991505ms
Avg time per pass: 2323.0534999991505ms = 2.323s
Another good improvement. It makes sense that removing a simple conditional makes a difference in a function that gets called multiple times for each pixel in the scene.
-
Optimized vec3 class: Removed data type conditional, split into sub() and subfl() functions.
Total time for 10 passes: 19076.914999997825ms
Avg time per pass: 1907.6914999997825ms = 1.908s
-
Optimized vec3 class: Removed data type conditional, split into mul() and mulfl() functions.
Total time for 10 passes: 13542.010000004666ms
Avg time per pass: 1354.2010000004666ms = 1.354s
-
Optimized vec3 class: Removed data type conditional, split into div() and divfl() functions.
Total time for 10 passes: 11327.610000003915ms
Avg time per pass: 1132.7610000003915ms = 1.133s
From over 4 seconds to a little over 1 second - that's pretty good.
-
Optimized vec3 class: Removed data type conditional from dot function.
Total time for 10 passes: 3915.465000001859ms
Avg time per pass: 391.5465000001859ms = 0.392s
One small change, but huge improvement. The dot product is calculated three times each time the hit() function is called. The hit() function is called for every sphere in the scene and each time the color() function is called. And the color() function is called not only for every pixel in the image, but in each iteration to take a random sample for anti-aliasing. For this scene with only 2 spheres, I counted 13,668,600 calls to the dot function.
-
Optimized vec3 class: Removed data type conditional from cross function.
Total time for 10 passes: 3895.2699999972538ms
Avg time per pass: 389.5269999997254ms = 0.39s
Not much improvement, but this was to be expected because the cross() function is not called anywhere yet.
-
Optimized main loop: Removed wrapper function for Math.random(), removed parseFloat() calls.
Total time for 10 passes: 3318.5450000019046ms
Avg time per pass: 331.85450000019046ms = 0.332s
This was quite a significant improvement as well. parseFloat() is quite a heavy operation and should probably be avoided if you're not trying to parse a float from a string input.
-
Optimized main loop: Replaced parseInt() with Math.round()
Total time for 10 passes: 3137.2150000024703ms
Avg time per pass: 313.72150000024703ms = 0.314s
First I was surprised that this would improve performance. But if parseInt() is used to parse ints from a given string, it probably makes sense that it has to do more work than Math.round().
-
Optimized color function: simplified return value for non-hits
Total time for 10 passes: 2876.939999994647ms
Avg time per pass: 287.6939999994647ms = 0.288s
The color function is used very often: for each pixel and each iteration to get a random sample. Even a small savings per iteration will add up to quite a lot.
-
Optimized sphere hit function: replace this.radius*this.radius with pre-computed this.rsquared
Total time for 10 passes: 2784.8399999966205ms
Avg time per pass: 278.48399999966205ms = 0.278s
The idea here was that the radius doesn't change. There's no need to calculate radius-squared each time the hit function is called. This is not a huge difference, but I imagine in more complex scenes it might become a more noticeable improvement.
Here is the updated vec3 class.
At only 0.27-0.28 seconds the image was visible almost as instantly as the previous test images. But I was afraid that a more complex scene would quickly result in render times well beyond 5 seconds. To make it work in a browser I thought I should divide the render loop into multiple independent calls that will give the browser's and Javascript's main thread some breathing room for other tasks.
In the first version I created a simple render loop with window.setTimeout(), then I changed it to use window.requestAnimationFrame() instead. Both methods work. The major difference is that setTimeout runs until its done even if you switch to another browser tab, and the current tab or window loses its focus. The other disadvantage, which is more relevant to time-critical applications, is that the next timestep is not guaranteed with setTimeout. RequestAnimationFrame on the other hand has a guaranteed step time, and it pauses if you switch to another browser tab, giving resources to the app that needs it most.
This works pretty well for all three canvases on this page. It doesn't block scrolling or anything else on the page. This 'animation' of course slows down the total render time compared to rendering the image in one go. But while the images are being rendered you get something to watch, and the browser remains responsive, which I think in this case is acceptable.
Later on, when it's time to introduce an acceleration data structure and optimize the ray intersection tests, or when I explore the use of shaders or WebAssembly, I might change the render engine to return each image without this 'animation'.
Final note: I ran these tests with a 200x100 test image, but since testing these I have changed the image size to 320x160. These times will vary with the new image size, and of course on different computers.
If you have any other ideas how this can be improved further (for now, in vanilla Javascript) for a more interactive web ray tracing experience, I'd always love to learn more. :)