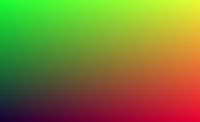
Summary
- Explored options to save generated images in other file formats.
- stb_image.h in C++.
- Pillow and tkinter in Python.
stb_image.h
The "stb_image.h" single-file
library makes it easy to write and convert images to other file formats. The simplicity
of the PPM format is great, but sometimes it makes more sense to save the image in
a web-friendly format and avoid additional steps to convert the image.
Click to view C++ source code
// stb-example.cpp
#include <iostream>

#define STB_IMAGE_IMPLEMENTATION
#include "stb_image.h"
#define STB_IMAGE_WRITE_IMPLEMENTATION
#include "stb_image_write.h"

int main() {
  int x, y, n;
  // unsigned char *data = stbi_load("foo.png", &x, &y, &n, 0);
  unsigned char *data = NULL;
  const char* filename = "./stb-example.png";

  int nx = 200;
  int ny = 100;

  // @TODO: yeah, malloc is probably not the best approach
  data = (unsigned char*) malloc(nx * ny * 3);
  if (data == NULL) {
    printf("Could not alloc image buffer.\n");
    return 0;
  }

  for (int j = ny-1; j >= 0; j--) {
    for (int i = 0; i < nx; i++) {
      float r = float(i) / float(nx);
      float g = float(j) / float(ny);
      float b = 0.2;

      int ir = int(255.99 * r);
      int ig = int(255.99 * g);
      int ib = int(255.99 * b);

      data[((ny-j-1)*nx+i)*3+0] = ir;
      data[((ny-j-1)*nx+i)*3+1] = ig;
      data[((ny-j-1)*nx+i)*3+2] = ib;
    }
  }

  stbi_write_png(filename, nx, ny, 3, data, 0);
}
Click to view Makefile
// Makefile
CC = g++
CFLAGS = -g
INCFLAGS = -I./ -I./stb/
RM = /bin/rm -f

all: stb-example
stb-example: stb-example.o
  $(CC) $(CFLAGS) -o stb-example stb-example.o
stb-example.o: stb-example.cpp
  $(CC) $(CFLAGS) $(INCFLAGS) -c stb-example.cpp
clean:
  $(RM) *.o stb-example *.png
run: stb-example
  ./stb-example
Python and Pillow
Pillow is a fork of the Python Imaging
Library (PIL) and makes it very easy to create, load, edit and save image files. It also
features a show() function that opens the image in the default viewer automatically.
The source code for the previous PPM version didn't require a lot of changes: just a few
lines to import the Image library, create an empty image with the desired size, load this
image into a pixel variable, update the pixels with the calculated RGB colors, and finally,
save the image file.
Click to view Python source code
#!/usr/bin/env python3

""" Simple Image with Python and Pillow
"""

import sys
from PIL import Image

def main():
  nx = 200
  ny = 100

  img = Image.new(mode="RGB", size=(nx, ny))
  pixels = img.load()

  for j in range(img.size[1], 0, -1):
    for i in range(0, img.size[0], 1):
      r = float(i) / float(nx)
      g = float(j-1) / float(ny)
      b = 0.2

      ir = int(255.99 * r)
      ig = int(255.99 * g)
      ib = int(255.99 * b)

      pixels[i, ny-j] = (ir, ig, ib)

  img.save('./output/ep002.png')
  img.show()

if __name__ == '__main__':
  sys.exit(main())
Python, Pillow, and tkinter
Tkinter, or "Tk interface" is the standard Python interface to the Tcl/Tk GUI toolkit and provides
modules for dialog boxes, color choosers, mouse events, etc. This example below simply displays the
image in a window, but tkinter could be used to build this out to a more interactive app.
To draw the image on the canvas, I could either draw each pixel individually using the create_line()
function, or use the Pillow Image object and fill the canvas with the create_image() function
instantly. When I tested this, create_line() took significantly longer and the window didn't
respond very well anymore. The Image object was the way to go there.
Click to view Python source code
import sys
from tkinter import *
from PIL import Image, ImageTk

def rgb_to_hex(rgb):
  return '#%02x%02x%02x' % rgb

def main():
  nx = 200
  ny = 100

  img = Image.new(mode="RGB", size=(nx, ny))
  pixels = img.load()

  app = Tk()
  app.geometry(f"{nx}x{ny}")

  canvas = Canvas(app, bg='black')
  canvas.pack(anchor='nw', fill='both', expand=1)

  for j in range(ny, 0, -1):
    for i in range(0, nx, 1):
      r = float(i) / float(nx)
      g = float(j-1) / float(ny)
      b = 0.2

      ir = int(255.99 * r)
      ig = int(255.99 * g)
      ib = int(255.99 * b)

      # canvas.create_line(i, ny-j, i+1, ny-j,
      # fill=rgb_to_hex((ir, ig, ib)))
      pixels[i, ny-j] = (ir, ig, ib)

  image = ImageTk.PhotoImage(img)
  canvas.create_image(0, 0, image=image, anchor='nw')

  app.mainloop()

if __name__ == '__main__':
  sys.exit(main())
The complete examples are also available in my ray tracing repo.
Links
 Back to The First Image
 Back to Ray Tracing
 Continue with The Vec3 Class